
Rock painting.
Learn how to create realistic rocks in your paintings.
Underwater or out of the water,
understand simple patterns and processes
behind realistic rock painting.
Rocks are a little bit like water.
Huh??!!
By that I mean they will generally pop up in a large range of paintings.
Having a strategy to make your rock painting process simple, makes your painting process much more enjoyable.
We'll look at these aspects of painting rocks:
- General Rocks
- Wet Rocks
Let's start with a tactic that will simplify painting rocks. Let's paint lots of them in one go. Painting just one will be a snap after that.
We need to find a pattern. Every rock, or clump of rocks has some form of pattern. That pattern may be in the shapes or in the colour. Or both. It can also be in the way they are strewn around.
Sometimes the pattern is the randomness of them. What the?? Look hard enough, and it will make sense. Rock painting firstly involves taking the time to closely look at rocks, rather than paint them.
For example:
The headland close to where I live is strewn with granite boulders. Millions of them. Initially, painting them seems like a nightmare. BUT. After looking for a while you begin to notice something. They are all relatively smooth. They are nearly all the same colour. And most of them are roughly the same size.
The trap with this when creating a rock painting is the tendency to paint them all the same.
There needs to be enough variation to make it convincing. Make a few rocks larger, and a few smaller, and scatter them randomly throughout the painting. It's the random-ness and the size difference that makes the image appear more lifelike.

Using a similar example, we will look at another strategy that will help. Looking at these same rocks, you'll notice an obvious difference in shading. There are dark areas, and light.
Looking at the randomness we mentioned above, you will notice that because of the angle of some of the rocks, they will have either more highlights, or more shadow.
This is not a bad idea when starting out with rock painting. It is a nice basic, broad approach.
Mix a colour as close as you can get to the shadow area. (If you're using a photo, you can touch a tiny corner of the paintbrush against the image to see if the colour matches the shadow). If it does, apply the colour in a random fashion. Mix up your brushstrokes - shorter, longer, up and down.
As the rocks recede into the distance, use a smaller brush. OK, so you should have replicated, roughly, the randomness of the shaded areas. Now stop. Look at your rocks again.

At this point, we need to look at the rocks in a slightly different way. Find one rock. The one that is most like all the others. (*chortle*). I actually do mean that though.
Now I want you to break it into three colours/tones. The first one you've already done, the shadow.
Now find the highlight. This will be the palest part. Apply this now to the upper edges of the rocks, using this application to again create some randomness.
Don't take too much time, as we'll go back and re-establish these highlights. They are only there to give us a rough "feel" for what we are painting.

Go back to your shadow. See if you can identify one intermediate colour or tone between the shadow and the highlight.
Mix and apply it on top of and slightly above the shadow, leaving some of the darker shadow showing. You can soften the edges of some rocks and leave other edges hard.
When that is done, re-paint your highlights. A little bit of to-ing and fro-ing (technical term) may be necessary.
You may have to make a couple of rocks a little darker, or a little sharper. The good thing is though, that the major part of the rock painting is done.

All you need to do is "individualise" a couple. You now should have on your canvas a collection of rocks, of varying sizes and shapes, but all roughly the same colour.
This process is a simple way of building depth and shape into your rock painting. Isolating these tones and/or colours and using this process, is a whole pile easier than painting each rock individually.
It's also a lot easier than waving your paintbrush over the surface, hoping that it will eventually turn into a beautiful rock painting. At least you're going in with a plan.

These rocks are smooth. BUT. If they were broken and jagged, a similar process would apply. The difference being that your approach would be less soft, and you would leave harder and more jagged/rough edges.
So far we've looked at painting general rocks. There are so many rocks in the world, we couldn't possibly cover every nuance of every rock. BUT. The fundamentals above will get you started.

Because water and rocks are two things that appear in millions of scenes, sooner or later there's going to be some wet rocks that you want to paint.
Guess what? The same rules apply! There is, however, one element added to these that will complicate the process a little.
Yes. It's water. So what? Water will often darken rocks. And, water makes stuff shiny. That means reflections.

Also, because the rocks are wet, you will get slightly less tonal variation. Time to go and look at rocks again. This time wet ones.
What can you see reflected on the wet rocks? Up close you'll see the sky probably, and possibly rocks next to it. If it's shiny enough and the angle is right, you'll see YOU!
A close up of shiny wet rocks, is probably a whole nother web page.

Let's move back a little, and see what's reflected in our rocks. You'll lose the detail, so you will probably just see the sky behind.
Go back to the process mentioned above. Isolate the darkest darks. Find your highlights and your intermediate colours.
Notice the strokes you need to apply to create the illusion of the texture on the surface of the rocks (dry brushing can be wonderful - link to brush techniques page).

Shorter jagged strokes means sharper "broken" rocks, and smoother, softer gradations means rounder, smoother rocks.
Now, for the coup de grass, your highlights. Your sky, or other light, will be reflected in the rocks. The brushstrokes you use will suggest the texture of the rocks, same as before.

One last thing. Sometimes the light source is behind you. You will still be able to see the sky reflected on the upper edges of the rocks, BUT.
You will have nice, intense spots of lights light to represent the sunlight reflecting back at you.
You have now completed Rock Painting Basics 101.

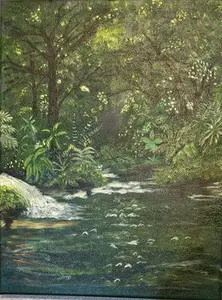
"Over The Shoulder"
Watch how Mark painted the wet rocks pictured above!
So don't just sit there, go and paint some!
Or at the very least, take a glass of wine
and go and study them.
Rock on!
Search This Site:

WTH is Acrylics Anonymous?
For more great painting tips, subscriber only specials and zingin' humour (hmmm, maybe?), subscribe to our monthly e-zine, Acrylics Anonymous. It’s fast, free, and we don’t send you junk. As a valued subscriber, you can purchase our 3 pack of downloadable how to paint with Mark Waller DVDs for only $80, or our downloadable V-log “Coral Reef - Underneath” for only $12.
See your subscription confirmation email for more details.
Subscribe here:
Recent Articles
-
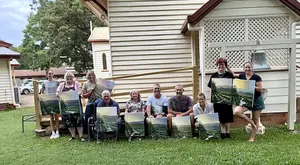
Upcoming Workshops with Mark Waller
May 26, 26 01:20 AM
 Upcoming workshops & tutorials in your local areas, check here!
 -
Workshops past. Been & gone. Delve into past notes, info and stories.
Apr 20, 26 07:27 PM
 Mark Waller's workshops past - discover what was learned about, talked about, laughed about and consumed with gusto!
 -
Mangrove of Costa Rica
Feb 09, 26 08:25 PM
 I often visit my sister in Costa Rica where she and her husband live. They have a vacation destination business. People come to stay at one of the homes
 Subscribe to this site!


![]()
About Us | Contact Us | Sitemap | Disclaimer | Privacy
Our Partners:
Copyright© 2007- All Rights Reserved