
How To Paint Trees.
Observation and Technique.
The Key To Great Trees.
How to paint trees.
Train your eyes to find the patterns.
Then train your brush to make the patterns,
and watch your trees come to life.
When learning how to paint something realistically, there are two skills that are vital. Learning how to paint trees realistically is no different.
These skills are:
√ Make your brush do what you need it to do.
√ You need to be able to "see" the tree in enough detail.
While it's not important to include all the information, it is important that certain aspects are seen and painted.
Your job is to find out what that information is, and then how to apply it with a brush.
How To Paint Trees - Learning To See
(The easy bit.)
The first part of learning the process of how to paint trees is to learn how to observe them. "Don't be stupid!" I hear you say, "I've been looking at trees all my life. I know what a tree looks like!". I'm sure you have. BUT! There's looking, and then there is really seeing. There is a big difference between knowing what a tree looks like in general, and knowing what it looks like in order to paint it.
How To Paint Trees - Patterns and Shapes
Lets investigate the patterns that trees form. Every living thing has a design that somehow sets them apart. Within that, they are all different.
When painting trees, you have to find the pattern that sets it apart from other species. The beauty is that each individual tree is different. This is your "get out of jail free" card. You have some freedom to allow your brush (and whim) to wander a little. You have some room to move.

So, some examples.
What we need to know before taking on painting trees:
Is the tree roughly conical?
Mushroom shaped?
or….......?
Find the overall shape of the tree.
When you have done that, you will notice that a mushroom shaped tree will not fit the profile exactly. Why not? Is there a piece missing? Find all the large shapes that make the outline of the tree. Draw it on a scrap piece of paper. Each time you draw (or paint) something, you will almost always see something you did not see initially.............Drawing forces you to really look.

When you've discovered the rough shape of a tree, I find it useful to start looking at the smaller shapes. The foliage for example. Does the tree have large leaves? Or small? What patterns are formed when the leaves emerge from the branches? Do they spiral around the branch? Or do they sprout apparently at random? This is important as, at some point, you will have to make a decision. Do I paint every single leaf (boring!) or, do I train my paintbrush to create the illusion of those shapes?
Then there is the trunk and branches. Are they relatively straight? Do they tend to grow upright? Or at angles? Often understanding the structure of the branches makes painting the leaves easier.
Careful observation and some experimentation with your paintbrush will often find an easy way to achieve the effect. Pounding a paintbrush on its bristles, and applying dry paint can often create the illusion of random leaves. A smaller brush on its edge can create branches very easily. I know I bang on about it - but experiment, experiment, experiment! (It's the same as practising - but sounds more fun).
Before painting trees, really take some time to look. Often we leap into painting trees with a pile of enthusiasm, but not much idea. Developing an idea beforehand, will make the process of learning how to paint trees much more fun.
How To Paint Trees - Actually Painting Trees
You don't have to be Einstein to see that a pine tree (Norfolk) is fundamentally different from a Boab. This stands to reason.
Unfortunately many of us have painted a majestic pine tree, only to stand back and realise that it does look more like a Boab. Why? Is it perception skills? In this case probably not. I would say it is your ability (or inability, but that sounded harsh) to use the brush. You will hear me say regularly that athletes get little of their skills from actual competition. Same here.
Drag out a blank canvas and practice making the brush create the shapes.
How To Paint Trees - A Fun Exercise:

Drag out a book (preferably with trees in it) and select one tree. Or even better - get outside and find a tree! (Those of you living in the middle of the Sahara, or Antarctic are exempt). Using one colour and one brush, reproduce it (sounds bossy, but it is just an exercise!).
Go back to your perception skills. Is the shape right? Have you reproduced the patterns and "texture" of the foliage? Does it look similar to the one you painted? If not, why not? Is it taller? Leaner? Less structured? More structured? Etc etc.
Go back to your brush. Do you know how to make it reproduce the patterns and texture of the foliage? Again, practise and the results will come.
This exercise will hone your ability to use the brush. It will help sharpen your perception skills. It will remove some of the pressure of working on an actual painting (you know that many of you get very precious) and, pushing paint around is always fun.
After this exercise you will be at least one step closer to mastery.
How To Paint Trees - Creating The Illusion of Volume:

It's one thing to find the patterns and the shapes. It's another thing entirely to give a tree depth and dimension.
How do we do that? The answer is, by understanding and creating highlights, shadows and variances in tone and colour.
Whenever you have a spare afternoon, grab a glass of your favourite beverage, and study a tree in the last hour or so before darkness falls.
Depending on how strong the light is, you will notice some deep shadows.
Why do they look different from the highlights? See if you can work out the transition from dark to light.

When painting, you will need these observations. You are almost rebuilding the tree.
Not only do you have to put in the darks and the highlights, you also have to put in everything in between. You have to recreate the transition while staying true to the "texture" of the foliage.
That may sound a lot easier than it actually is. It requires a lot of practise for those starting out.
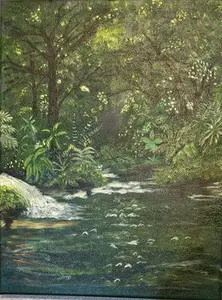
These photos will show you the construction process.
I'm maintaining the texture and feel of the tree by using my brush in particular ways.

For example, I use the tip of the brush in alternating directions (cross hatch) to create the broken effect of highlights on the foliage.
Each layer of highlights is painted in a slightly different direction from the layer beneath. This creates a wonderful broken transition of colour, and gives us the illusion of volume.
In the following example, I'm doing exactly the same thing. Except this time I'm using the tip of my brush, and applying strong daubs of colour to create the illusion of individual leaves.
Lighter leaves over dark gives volume and dimension.

We could write about four hundred pages on the topic of how to paint trees. But hopefully these snippets are useful.
Stay tuned for a more in depth look at how to paint trees.
Until then, jump around like a fool and throw paint around!
Have a look at the footage below on my "default settings" for trees. These are my go-to colours to help you get paint down, fast.
This short clip shows you how versatile 3 colours can be in varying light situations, for painting trees, foliage and grass.
Enjoy!

Search This Site:


WTH is Acrylics Anonymous?
For more great painting tips, subscriber only specials and zingin' humour (hmmm, maybe?), subscribe to our monthly e-zine, Acrylics Anonymous. It’s fast, free, and we don’t send you junk. As a valued subscriber, you can purchase our 3 pack of downloadable how to paint with Mark Waller DVDs for only $80, or our downloadable V-log “Coral Reef - Underneath” for only $12.
See your subscription confirmation email for more details.
Subscribe here:
Recent Articles
-
Workshops past. Been & gone. Delve into past notes, info and stories.
Apr 20, 26 07:27 PM
 Mark Waller's workshops past - discover what was learned about, talked about, laughed about and consumed with gusto!
 -
Upcoming Workshops with Mark Waller
Apr 06, 26 11:49 PM
 Upcoming workshops & tutorials in your local areas, check here!
 -
Mangrove of Costa Rica
Feb 09, 26 08:25 PM
 I often visit my sister in Costa Rica where she and her husband live. They have a vacation destination business. People come to stay at one of the homes

 Subscribe to this site!


![]()
About Us | Contact Us | Sitemap | Disclaimer | Privacy
Our Partners:
Copyright© 2007- All Rights Reserved