| Back to Back Issues Page |
 |
|
Acrylics Anonymous, Issue #106 -- One For The Dads. August 01, 2021 |
Passionate about painting with acrylics? Need a monthly fix chock full of inspiration? Need some help to take the pain out of your painting process? It's all here for you. Acrylics Anonymous. Zero elitism. Dive in. If you enjoy Acrylics Anonymous, and you know someone who might also enjoy it, you can share by forwarding it to your friends! If you are receiving this because a friend has forwarded this to you, and you would like to subscribe, click here! 
Every month, we will produce a Subscribers Only "sealed section" - just keep scrolling to see it. It could be a painting technique, a short video tip, or anything we can think of that we reckon you might enjoy. Please let us know what you think, we love your feedback! To leave comments, contact us here.
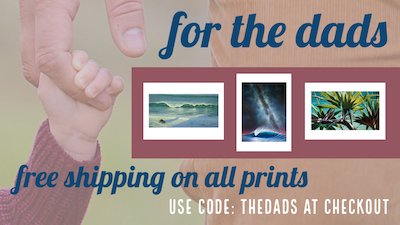
Click here to shop for your Dad a Limited Edition print!

As a Dad, sometimes there can be a lot of responsibility put on you. And we blokes tend to suck it up and soldier on sometimes when we should take a break. So make sure you take extra time to paint, or get out in nature and find something to paint. OR, at the very least, make time to do something YOU want to do on a regular basis. 
Northern Rivers Review Mark and lovely wife Nic were recently interviewed by the Northern Rivers Review about life, cancer and being followed by a filmmaker for 20 years. In case you missed it, here's a link to the digital copy of the article. Click here for the article. Esk Workshop Notes Those of you who enjoyed our recent 2-part Youtube videos on painting a beachscape, might enjoy having a look through the recent Esk workshop notes for the next part - adding coastal foliage! Click here for the workshop notes. New Vid on our Youtube Channel We have recently released a new video showcasing the process of painting a beachscape (and iconic Lennox Head "The Point" headland) as a timelapse. No talking in this one, just 8 minutes of process with some atmospheric tunes so you can see what goes into the process of making a commissioned beachscape painting. Hope you enjoy! Click here for the video!  Every month, we choose an Artist from our
forum
to showcase.
Every month, we choose an Artist from our
forum
to showcase. You can even nominate someone if you like. (Or yourself!). To do this, check out the forum and then send us an email! It’s that easy. This month we're featuring artist Lorraine Fliszar from Winter Haven, Florida, with her painting,"End Of A Beautiful Day". Thanks for sharing this lovely painting with us Lorraine! Click here for more information on Lorraine's "End Of A Beautiful Day"

Tahlia Stanton is an incredibly inspirational Australian artist, creating beautiful pieces which explore vibrancy and freedom and an overwhelming love of life in her artwork and ethos. Go check her out - she also puts her process vids up on Instagram and Youtube and these are excellent! Have a look at Tahlia here. Another incredible artist creating 3d resin painting art is Martina, one half of dynamic creative duo Nerdforge on Youtube. Check out her process for creating this dystopian masterpiece! Check out Martina's process here! If you have a link you like, please share it with us! You can contact us to let us know. Thank you!  This is the section where you can "get your name in lights!" (well at least out there in the internet world!).
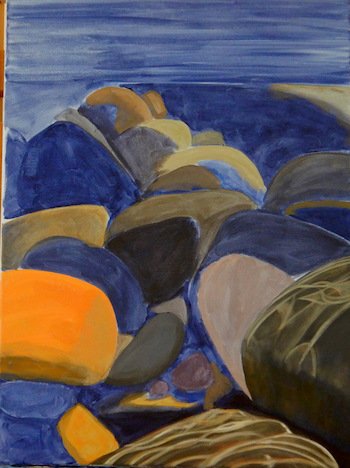
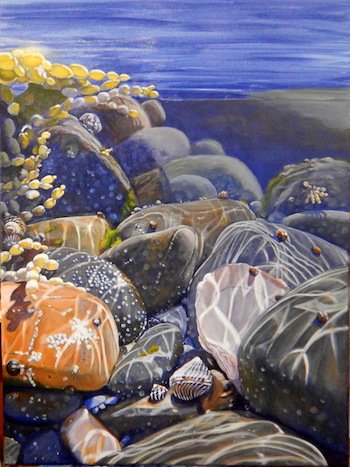
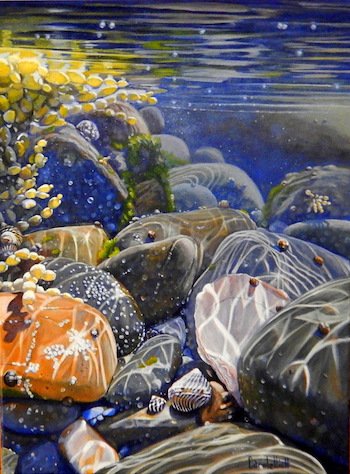
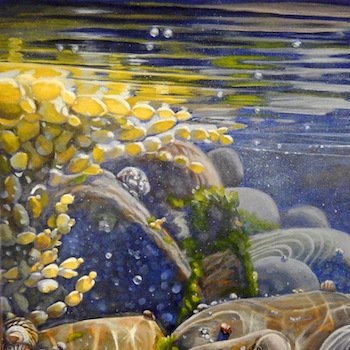
If you have works in progress you would love to show off, or finished pieces you are particularly proud of, we would love to see them! We especially like to hear about the story behind the creation. This month's submission comes from very talented artist Carole Elliott, who we were lucky enough to feature in this section back in 2016 . From Carole: "I love painting pebbles, and managed to take some great underwater reference photos in a rockpool on the mid-north coast of NSW. The painting was going to be pretty intricate but I dealt with this by breaking it down into bite-sized chunks, concentrating on one area at a time and problem-solving as I went along. I used Atelier Interactive acrylics on a stretched canvas. Step 1:
Step 2: For some reason I decided to start at the bottom of the painting and work my way up, which isn’t usually the way I work. Each pebble is completely different and I had to concentrate on the tones in order to develop the individual shapes. There were also small shells attached to the pebbles, not to mention all the light refractions, which really added to that underwater feel.
Step 3: Moving further up the painting, I added more pebbles and small shells. The light refractions were painted using lots of dry brush-work. To do this I like using a bristle brush that has been well worn down. I dampen the brush and then get as much water out of it as possible. I then add a small amount of paint to the brush, wiping most of it off before applying it onto the canvas in a sort of scrubbing motion. If it doesn’t work properly it usually means there is too much paint on the brush or the paint is too wet. It takes a bit of practice! I also loved adding the white shell, the main focus of the painting.
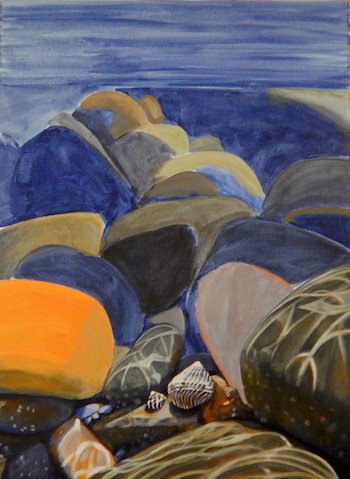
Step 4: I was excited to start adding in the seaweed, using brighter yellows in areas where the sun was shining through and making them transparent. There were also a lot of bokeh circles created by the underwater light, especially in the darker areas, which were interesting to paint, again using some dry brushwork.
Step 5: More seaweed was added, making sure to create contrast between the shadow areas and bright sunlight. When painting the pebbles and shells in the background of the painting I made sure the edges were softer than in the foreground pebbles in order to create depth. You will notice the colours of the background pebbles are also more subdued with more blue added to them. The areas of green weed were initially painted in varying shades of grey and white and then glazed over using transparent colours with a bit of Clear Painting Medium added.
Final Steps: There were a lot of small air bubbles just under the surface of the water and I created these by splattering some lighter paint using a toothbrush which worked really well. The surface of the water was then added, with reflections and small bubbles just under the surface.
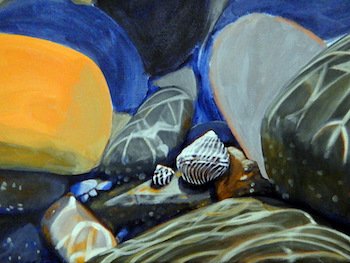
Close-up 1 – shows the detail in some of the shells.
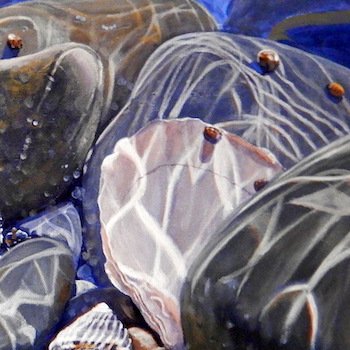
Close-up 2 – Shows the detail on the white shell. Notice the soft edges of the light refractions and some of the bokeh circles in the shadow areas.
Close-up 3 – You can see the detail of the seaweed and some of the small bubbles. Also the softness of the edges on the pebbles and the splattering effect to create the air bubbles just under the surface of the water. I hope this inspires you to go out and try painting your own underwater rockpool. There are lots of different techniques you can use in your paintings to add interest and create atmosphere!
Click here for Facebook, Click here for her Instagram, And click here for her website! We hope you enjoyed this issue of Acrylics Anonymous! If you have any suggestions, comments or feedback for the ezine or our site, please don't hesitate to contact us. Until next time, make sure you stay safe and well, and chuck some paint around! Cheers from Frankie & Mark :) For our Youtube channel, click here. To join our Youtube channel as a member for a few bucks every month (in exchange for even MORE awesome perks, click here. For our Instagram, click here. For our Website, click here. For our Facebook page, click here. For our Pinterest, click here. |
| Back to Back Issues Page |